Tuesday, September 29, 2009

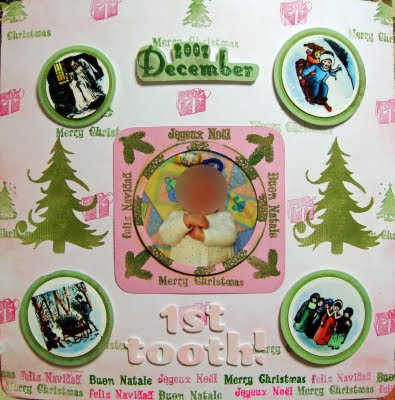
Baby Layout:: December 2007

Well, in this layout I faced two major problems:
1) I had only one photo of my niece (don't know how that happened!)
2) I didn't have any christmas cardstock, not even a scrap!

So, I took a white cardstock and made a christmas one! This is how:
I colored it with Ranger's Worn Lipstick distress ink varying the density of color.
Then I stamped it with stamps from an old Fiskars christmas set (can't remember the name), starting with the christmas tree, from the center of the page and moving diagonally towards the four corners of the page. Then I used the little gift stamp and stamped in parallel, along the lines of stamped trees. Finally I stamped the bottom of the page with the "Merry Christmas" stamps.

Then:

I made a mat for the photo and placed it in the center of the page.

I stamped the little images (Dovecraft "Victorian Christmas", lovely set), colored them, cut and embossed them with nestabillities, then I used light blue chalk to color the backround of each image, after that I used versamark and utee to create a shine and finally I adhered them on green paper that was cut one size larger than the image.

Next, I added the letters (american crafts white thickers), but before that I colored them in a funny way: I place them on a paper towel, folded the paper towel over them and then pressed a light pink inkpad over the paper towel. The results were really interesting and will be more so next time, I plan to use a more intense color so as to create more contrast wth the white thickers.

On the right and on the left I adhered the larger green trees, they were leftovers from last year (and they came handy, that's why I don't throw away the scraps!)

Oh, it was fun fun fun making something from scratch!

Sunday, September 27, 2009

Baby Layout: November 2007

For this page I used a green pink color scheme (K & Company "small wonders girl" paper) because it matched the baby's outfits from the photos.
I wanted to give emphasis to one photo so I used my nestabilties to create a mat. I didn't waste the "negative" square, I used it to create a sort of frame for my journaling.
Then I added thickers (american crafts, I bought them white so I can color them to match any color scheme).
For the flower accents, I stamped them on white cardstock (Gina K's stamps and pure luxury cardstock), colored them with my copics and used pop dots to adhere them on the page.
Finally I added the little bow on the left to add some "weight" and finished it with some free hand doodles. Very cute and girly!

Baby Layout: October 2007

In this page two out of three photos were taken during a warm October evening, and they have a yellowish warm tint.
So I decided to mat them with a dark blue cardstock paper, I sanded it to decrease the contrast and to soften it down. The patterned paper is K&Co.
For the stamped image, first I stamped it (Crafty Secrets stamp) and colored it with my copics, then I used nestabilities to cut and emboss the outline and finally I used Pebbles chalk to color the backround.
I cut with my cuttlebug the letters, from the same sanded cardstock and then I added the faux stitch with a Sakura pen.
Then I added the journaling spot (HOTP) in the left.
For the punched out stars I used DCWV yellow glitter cardstock.
The page came out a little "heavy" at the bottom, but I didn't want to alter or add anything more.

Wednesday, September 23, 2009

Copic Talk: I'm enchanted!


I received my Copic Sketch markers and I love them!
I bought them from HERE $69,50 with shipping and I chose the basic color set since I was totally confused about what colors I should start with.
Now, the quality is really excellent, they blend beautifully and I'm happy I decided to buy them. Of course I've read a ton of blogs etc saying how good these markers are, but I was a little sceptical thinking that maybe it is just a craze amongst the crafters, but no, it really is good stuff.
It works beautifully with Gina K's pure luxury white cardstock, the only problem is my ink (onyx black from Tsukineko), it smears, so I have to heat emboss it with clear powder prior to coloring. I've ordered Memento's Tuxedo Black, since everybody says it doesn't smear with copic markers.
These are the first attempts, the flowers are from the "A Year of flowers" stamp tv set, the results are almost what I tried to do!
What's more, I've ordered 9 more markers and the blender marker from HERE this time, because I prefer light shades and the set had mostly vibrant colors, $5,25 each BUT free delivery! Oh yes! It almost sounds too good to be true, I'let you know when I'll receive them.
I've also tried some free hand drawing because currently I'm in an "umbrella girl" obsession, and I try to draw one, unsuccesfully so far...
That's all for now!

Tuesday, September 15, 2009

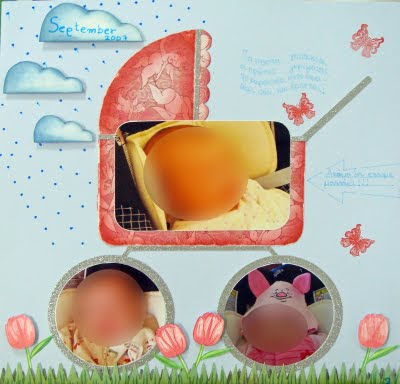
Layouts: Baby stroller

Well, I accidentally came up with this layout: I had in front of my the three photos, and I wasn't sure about positioning them on my page. I tried various combinations and decided to put the large one in the middle and the two smaller at the bottom.
When I did it, I saw the "picture" of something on two wheels, so I decided to keep the idea and elaborate it.
And this is the result!

I used nestabillities for the wheels. I added the silver paper to imitate the tires and the metal structure. I used distress ink on the pink patterned paper (Basic Grey leftover, but I'm not sure!) it actually shows little cupids but they also look like babies or angels.
I cut by hand the "grass" from two strips of green scrap paper, one darker than the other to add some depth to it. Then I stamped the tulips, stems and leaves with my GinaK stamps set and colored it with my markers.
Now, the rain didn't work out very well because the angle of the drops is wrong, so I put on top clouds (free hand sketches that I colored with distress ink). The little butterfly is Inkadinkado.
As for the journaling templates, they are HOTP.

I had lots of fun making it!

Monday, September 14, 2009

Layouts: Dream

Two out of the three photos show my niece while she's asleep, and I wanted a serene and calm background paper, so I chose one from the "Bailey" K & Company collection.
I found a matching light beige-yellow cardstock and made the embellishments with my Cuttlebug, I wanted to keep it light and clutter free, so I didn't add a lot of stuff.
I discovered that I need some acetate for the journaling, in case I want the background to be visible, I put it in my shopping list! The little flowers are Prima and the month and year stamps are Inkadinkado.

I also sanded the edges of the photos, I liked the effect.

Card Making: Flower Frame


This is a funny card for my niece, the fact is that she is the sweetest girl but she hits hard enough (sometimes she even bites!) for her age (26 months).
So I used my nestabillities to cut a frame for her picture, I wrote “you’re a flower…” but the surprise is inside the card, where I continue “that hits like a bear”. In greek flower (louloudi) rimes with little bear (arkoudi), in loose translation.
The paper was bought at Lidl, it is really sturdy, perfect for cards and cheap. I used HOTP stitching templates, the little butterfly is Inkadinkado, from the Fairies clear stamps set.
As for the bear, it is a fact: I cannot draw animals!!! So, after a few unsuccessful attempts, I scrap something from white paper, it looks something between Winnie the pooh and Miss Piggy…

Thursday, September 10, 2009

Crafter's Net: Copic Talk 2

I'm currently under the Copic spell...
The fact is that I'm not happy with my markers since they scratch the paper, no matter how light the pressure of the strokes, no matter what kind of paper I use.
So, yes, I'm considering to buy some Copic markers, it's only the the cost that holds me back...
Anyway, I came accross THIS german online retailer, I think the prices are really interesting, unfortunatelly I don't speak german :-(
I also found THIS, and I'm seriously thinking to take my chances, hopefully the box is small and will pass unnoticed the greek customs! I've purchased stuff from jetpens in the past, mostly fountain pens, fast delivery, good service.

No matter what, nowdays it is really cheap to buy from usa given the currency rates (USD to EURO), so maybe it is now or never!

Crafter's Net: Stamp TV

I'm watching Gina K's videos on Youtube (Stamp TV) for quite some time now and I always enjoy them, she always shows simple and interesting techiques, things that anyone can try.
Recently, I wanted to try her Pure Luxury cardstock, but I couldn't find any information about delivery to Greece.
So I email them and they answered that they in fact do deliver to Greece through Priority mail, check out the details in THIS link.
So, I ordered two of her Pure Luxury cardstock for stamping, cardmaking etc and the "A year of flowers" stamp set, total delivery cost 12,95 in a Priority Mail enveloppe.
My parcel was delivered to my door, 7 days after the purchase! I didn't have as yet the time to make something with it, I just played a little as you can see in the picture, I used prismacolor pencils, and I really like the cardstock a lot, it is extra smooth, sturdy, the colour is pure white but not the greyish one, it has a warmer very subtle tint.
As for the stamps set, they come in one rubber sheet and you have to cut round the stamps, a little tricky if it is the first time (for me it was) but apart from this they are gorgeous, really well defined and they come ready with an adhesive backing that clings to the acrylic block.

Very happy with the total experience, one more checked and trusted retailer!

Saturday, September 5, 2009

Layouts: Flower Bouquet


I started scrapbooking because I wanted to make a special album for my - then - newborn niece, something that would capture her growth month by month. I update it every month, and at some point I will give it to her, it is something that she and her family will cherish for years.
Recently I realized that when the moment will come that I will present it to her, I will miss it, so, I decided to make a second one for myself.
And this is the first page!

The cute fairy is Inkadinkado, the bigger butterflies as well, I painted it with my markers (Tombow Dual), the hair has a greenish hue (I don' t know what happened!)
I really like the flower bouquet style, I came up with it when I was making a card for a friend. Nestabillities of course for the scalloped flower-frames. I cut the stems by hand, the leaves were cut with a cuttlebug die and used some distress ink to make the lines. For the journaling, I used a round HOTP journaling template with Pebbles chalk, I like it because the lines are soft and blend well with the paper. Once I tried pencil and after I wrote I erased them but the result was a dissaster, so I'm using chalk instead.

As for the bow, I really can't tie a beautiful one, so I made something that looks like one!

I had tons of fun making this layout, it really is exta cute!

Wednesday, September 2, 2009

Delivery Day: Patterned Paper and Cardstock


I just received my goodies and I'm so excited, I love all of them!

K & Company Bailey 30x30 paper pad, 36 two-sided papers, classic flowers and paisley designs in rich colors, really beautifull.
Also K & Kompany Hopscotch Girl 30x30 paper pad, 36 two-sided papers, really yummie colors and designs, I adore this pad.
Finally I bought a cardstock pack, Core'dinations Elements Super Assortment, http://www.coredinations.com/index.php/products/super-assortments/ , I can't wait to try it and find out what I can do with the colored core, definitely a little sanding or even tearing, who knows!

Now, ordering 12x12 paper pads or cardstock packs does not come cheap if you live in Greece, since delivery costs quite a bit when you order them from abroad, even when I'm buying from ebay. So, that's what I do:

On ebay, I choose a european site, for example ebay.co.uk. Then, I search for the desired object and on the tab "Preferences" -> "Location" I choose "European Union", since these items are heavy and large in size and even if I find something at a good price at ebay.com, there is the risk to pass through the greek customs, and if it does, well, that's a sad story...
Choosing European Union in the preferences, there is not such danger.

Besides ebay, there are a few (that I at least know) online retailers, in Europe, that I use, and recently I discovered two french sites:
The difference with these online retailers is that they charge a fixed sum for delivery to Greece, 12 and 10 euros respectively, and not accordingly to weight, value or volume, so if you want to buy heavy or large objects, it comes quite cheap. For example, I bought from la fourmi creative 2 paper pads (36 sheets each), a cardstock assortment (80 sheets) and an album, all 12x12 inches, and the delivery cost was 12 euros, delivered to my door (and not at the post office) 7 days after the day I ordered them.
Another aspect is that they have promotions and sales quite often, for example each K & Company paper pad cost me about 10 euros, I think it is a really good price.

If you happen to know and trust an online retailer in Europe that delivers to Greece, you're welcomed to share it with me!

Tuesday, September 1, 2009

Crafter's Net: Copic Talk

I recently discovered THIS blog and Marianne has tons of really interesting information about Copic markers.

Enjoy!

In the Lab: Stamping on metal

I wanted to do something crafty on my company's mobile phone because it is black and silver (and I seriously dislike black and silver, not my colors!) but at the same time I wanted to keep it low profile and discreet. So I removed the battery cover, stamped on it with a inkadinkado rose stamp and used a colorbox white-light gray color. Then I heat embossed it very carefully and slowly, avoiding overheating it (I was afraid that it would ruin the cover, bent it or something) using holographic embossing powder. The result was more monochromatic than what I wanted, so I used Sakura metallic Glaze pens to add some color, or to be more precise some hint of color, and it came out really beautiful and subtle, even though you can't see in my lousy picture.

I did it almost a month ago, so far it is ok, even though I treat it rather roughly, it hasn’t chipped or anything, but even if it does, I will do it again!

And everybody is asking me: how did you do it???

Scrap Room in Progress: Almost Done!

Well, after a few weeks of labour, while I couldn't thoroughly clean my hands, my clothes and my flip flops of streaks and blotches of paint, my scrap room (scrap corner in my basement to be precise) is almost done!
It still needs some decoration, but after spending days without end painting the universe (walls, the ceiling, the floor, the chairs) I don't think I'm going to use brush or paint any time soon now!
The really cute chairs were originally dark brown (they must be 30 years old or even more) and I mixed the colours myself: I bought just 3 colours (blue yellow and red) and white and the results were amazing! And the fun part is that I didn't plan it this way, I went to choose mixed colours at a hardware store, but the smallest quantity that I could buy was half a kilo per colour, and it would cost almost 7 euros per colour (!!!). So I bought three standard ready colours, quarter of a kilo each, and half a kilo white, and had it my own way! There is one more chair that came out mint green, and two wooden armchairs that are in blue shades, but I must dedicate a post to them, they have a special (hillarious) story of their own...
I also put together the wooden drawers on the left (35 euros each, from IKEA, I bought two and put them side by side so they make a long one, that's where all my scrapbooking stash is hidden) and I must say that I made my own on this object too, since the first one now has an extra hole, that was not in the manual. It is a tiny one though and not visible...I had really hard time to figure out the zillions of screws, it is more complicated than it seems because you have to assemble the outer box, then each drawer ant then combine them all together in a way that makes sense and is practical too...I only need to say that the first one took me 2 hours, the second one took me 30 minutes (and no extra holes!).
I'm really happy with the final result, it's a place where I can scrap or draw or whatever and have all my things organized.
And oh, I LOVE my chairs!!!

LinkWithin

Related Posts with Thumbnails